
Malenia Build Log
- darkesttears

- Jun 7, 2025
- 20 min read
Welcome to my Build Log about Malenia, Blade of Miquella from Elden Ring! I know it's quite overdue considering I finished this cosplay for the first wear in February 2023 but as they say - the one who waits for something good... Grab a cup of tea and a treat, this is quite a long one.
Also apologies in advance that the alignment of images appear to be impossible nowadays, I'll do my best when I have something going side-by-side.
Anyway, this post is likely going to be massive considering that I've reworked her, and thoroughly photographed almost every single thing in the process of making her. This cosplay is truly one where I've combined an abundance of techniques, and even still there's more I'd like to improve with her.
So, let's get started! I'm not sponsored by anyone other than myself, if any brands are mentioned it is purely for you the reader to know where I've ordered certain things in case you take inspiration from my build.
Materials:
Red lacefront wig from WigIsFashion
Additional wig wefts from Coscraft
Aluminum chainmail rings from TheRingLord
Red wool fabric
Brown nylon fabric
Beige lampshade..tassels (?)
Linen fabric
Embroidery thread
Faux fur
EVA foam of varying density and thickness
Acrylic paints of various brands, some golds from Cosplayshop.be
Custom printed fabric via Spoonflower
Black stretch fabric
Gold vinyl stretch fabric (?) really not sure how to describe this material
mock-up fabric
Silicone of different types
Plaster
Gray curtain fabric
Satin ribbon in various shades
Wood
Worbla (both brown and black)
Thibra
Leather
Leather dye
Rope
FoamClay
Contact Glue
Latex
Babypowder/talc
Spray hair conditioner
Hairspray (Got2B glued)
Gold fabric paint
Gold marker pen
UV resin
PLA Filament
Tools:
Domestic sewing machine (Singer Heavy Duty)
Overlock sewing machine (Janome MyLock)
Heat gun
Glue gun
A menagerie of different sized tongs
Various needles for handsewing
Elegoo Mars resin printer
BambuP1S 3d printer
Blender (3d modeling software)
Scanner
Printer (an actual regular one for paper lol)
Carpetknives
Scissors
Styrofoam wig head
Mannequin
Embroidery hoop
Silhouette cutting machine
Soldering iron
Woodworking tools, such as a saw and rasp
Yeah, I wasn't joking when I said I did ... a lot of different stuff for this
Let's start with the wig! I by no means followed any logic or structure when making this as usual, but I'll sort it out part by part here.


Here's the lacefront wig I chose, straight out of the package!
The first thing I did was to colourmatch the wefts I had ordered, and then sewing them into the wig to make sure I had enough for the extra volume I added later on.


I didn't use the entire pack of wefts, as it would be way too much hair to handle. When I stitched them in, I placed them between the preexisting rows.
Once all wefts were attached, I braided the whole thing and boiled it lightly
Starting with sectioning out where I want the braids


After braiding and boiling it, I let it dry on it's own in the tub before releasing the braids.
Braids released!


After releasing the braids, I brushed the whole thing out thoroughly with some added spray conditioner


After that, the final touch was to gently go over the whole wig with my curling iron. Malenia has a very ... let's say "trademark FromSoft hair texture" which is really difficult to achieve in my opinion.


After all of that, a final brushing and round of conditioner and the wig was done! I tried to keep the roughest texture closest to the scalp, as that would help with the overall volume and making sure that the lengths were appropriately rugged while still brushable.

Next I want to discuss the leggings, as I have a feeling I need to do a lot of explaining for this to be comprehensible (or I'm just an expert of not making sense IRL at contest judgings lol). I did not want to make FX makeup prosthetics for my legs, and I was very anxious about attempting to make any kind of stocking-hybrid-thing... So here's the ridiculous process that I went with as it made most sense to me!
For better or worse depending on your perspective, all FromSoft games have a very large mod scene. This means that it's really not difficult to either find all the files from the games (at least the PC releases) or extract them yourself. So since I as always was striving for screen accuracy with this project ... I grabbed a set of Malenia's files myself. You can easily find out online how to do this.
I will try to not get too technical with the next steps. Basically, every single 3D model in a game, has a "gift wrap" around it - this is called a texture. This texture is painted completely flat and then wrapped around the actual 3D model. In many cases, these textures are loaded as separate files in a game and then compiled however the developer has figured out to do that. Which means, in downloading the assets for Malenia, I could take a good look at her texture (the giftwrap).
With my files in hand, I made a pair of mock-up leggings, in order to mark exactly where certain parts of the rot would be placed to my anatomy.


After having my bases, I took one of the legs and placed it completely fat on the floor with the help of some tape. I then photographed it from as straight of an angle as possible from my ... bed. Yeah I had a loft bed still back then lol - incredibly convenient for these things!

With this leg photographed, I imported Malenia's texture image into photoshop and the leggings-photo. I then reduced the opacity on both, and started making tons and tons of adjustments to fit her original texture to my markings. I also adjusted the colouration and added additional length to the texture by hand, so it would fit to my whole legging-leg. Malenia only has her rotted skintexture where it shows - so the parts that are covered by her prosthetics are not a part of her actual skin texture. I do still have both my legs though, so I had to work around that.

After I was happy with my design, I ordered the whole thing via Spoonflower on their Sports Lycra fabric. It's extremely important that the project is scaled accurately when printing something like leggings with specific patterns that have to align.

I then waited patiently for a couple weeks while my print was processed - and then my fabric arrived!

Fabric in hand, I carefully cut out my pattern pieces and basted them together. I then stitched them on my overlock, added an elastic in the waist and the leggings were done!

I truly hope that all of that made sense - it seems like it's not uncommon to use this method for bodysuits/zentais.
The next painstaking part (I guess all of them were tbf) was the cape.
My choice of fabric was a red wool with a fairly coarse texture and slightly.. hm, sparsely woven. In Swedish it's called "glesvävd", basically the fabric doesn't have all is fibers tightly packed in the weave but it's still sturdy.
I started as usual with drafting my mock-ups for the cape. I decided to have the cape section as one whole piece as I didn't see any seams anywhere on Malenia's model or texture (or figure.. which I also used as a reference for scale). The hood was done as a separate piece and patterned to be both functional and accurate in appearance.


Cape piece drafted


Hood piece drafted. There's no middle seam on the hood, so I opted to shape it through placing darts where the folds are expected to go when laying on my back.


Placing the flat mock-up pattern on the wool, and then sewing it by hand. I opted to do this by hand to ensure that all the seams would align as I wanted and in case of any manual adjustment needed as this wool is ever so slightly stretchy - and I needed everything to align perfectly.


I then stitched on the fur by hand as a "tube". Meaning, I sew both ends at once and tighten it up so that the wool edge is inside of the fur "tube" but with no visible stitching.

For her iconic sigil on the back of the cape, I may have gone a bit unhinged.. I printed the sigil (from her assets) upscaled to the size I wanted and uuhh... taped it together and cut out every single detail by hand with a carpetknife.

Part of the process of testing the limits of my patience

Once all of that was cut out, I placed the pattern on my cape piece and started transferring the design with a gold marker pen. Once that was done, I filled in the whole pattern with gold fabric paint.


And the finished sigil!

After having the cape and hood finished, it was time to combine the two.
I stitched them together, and added a satin ribbon over the seam so as to ensure that it wouldn't tear or stretch unnaturally considering the nature of the textile.

The final thing I added was a gold painted kid's chew toy as it was the correct size of ring and also had an opening to "clip" it around the edge on one side.


Let's take a little breather with an actually simple part - the gray skirt. For this I chose a fabric normally used for curtains, as it had the weight, texture and slight shimmer that I aesthetically desired.
I didn't draft a pattern for this, as it's mostly just one rectangular pleated section with a channel in the top so that it can attach to the front chainmail piece. I started with drawing my sections on the inside of the fabric. I then pinned along the lines and ensured that the size was as desired.


After being happy with all my pleats, I stitched them on my regular sewing machine practically right by the edge of the fold


After having stitched all the pleats, I verified the overall size once more and hemmed the bottom as well as adding the channel up top.


The final touch on the gray skirt was to add a light drybrush of brown acrylic paint in all the folds on the outside.
Next let's take a look at the tiny dress which is one of the (in my opinion) best pieces on this entire costume. It's a shame that it shows so little in the design.
To start with, I drafted a tight dress with a zipper in the back.

I then looked at Malenia's textures again, upscaled and printed the section that goes on the front of her chest. I then transferred it onto my beige linen fabric using embroidery transfer paper, the type where you can trace your design and there's a chalk backing which will replicate the design onto your fabric.


I then refined the pattern so I could see it more easily, attached my embroidery hoop and got to stitching! I did all of this prior to cutting the pattern piece so that it wouldn't warp or stretch in an odd way due to the tension.


After the embroidery was done, I ironed the fabric and cut out my pieces. I then zigzag stitched the edges, basted and stitched on my regular sewing matchine. I also added an invisble zipper in the back.


Lastly, I adjusted the length and hemmed the entire dress, as well as shaded the embroidery using brown acrylic paint.


The chainmail front is up next! This was a bit of an odd piece to do, as I couldn't really figure out logically how it should attach to the entire ensemble.
The chainmail pieces themselves were very simple, standard 4-1 weave and 10 strands total


I then cut a leather piece of somewhat thicker leather, but still malleable, and sewed the chainmail strands onto it. I also added D-rings on each side which allows the whole thing to be connected via the channel in the top of the gray skirt.


I then used a more solid piece of thick leather which I wanter-pressed the details of engravings onto. This was then dyed silver, shaded, and attached to the top of the chainmail leather piece.


You can see in the above right photo how this whole contraption works - there's hooks attached to a ribbon that goes through the channel in the grey skirt. This is attached to the bottom chainmail layer, and then any edges and attachments are covered by the silver panel.
We're reaching the end of all the tailoring! Yippiee!
The brown dress definitely gave me a lot of headaches and was supremely time consuming as I decided to alter it a bit after it was already basically finished. I'll get to that soon.
As usual, I started by drafting my mock-up.


I then transferred my pieces onto the brown nylon fabric. This fabric was one of the worst fabrics I've ever worked with, but it looked juuuust right. Slight dusty shimmer when the light hits it... In real life it's an absolute treat - sadly doesn't translate that well on photos. The only good part was that it kept the ironed pleats quite well but that's also coming soon.
After transferring the pieces onto the brown fabric, I ironed folds in both the main dress pieces and the sleeve.


I meticulously measured and spaced all the pleats going in the waist, and stitched them with a satin ribbon so they'd hold the exact "scrunch". I then attached the sleeve onto the main piece, and stitched the shoulder seams.


The sleeve was also scrunched in the same way as the waist, and the edges cut in small triangles for the jagged edge. Here are the initial pieces assembled.


I had to use my whole brain to figure out the shoulder-flap-thingy so that it would have the proper volume and also allow for folds to be ironed.


I then attached the "lampshade fringe" onto the bottom by hand, and tied knots in the fringe at equal distances.


It was at this point that I realized the length of the dress was WAY too long, so I decided to trim it and re-did the above process once more with the fringe.
After that I handstitched the hem of the triangular points on the edge of the sleeve, and attached "loops" similar to the bottom part. The loops were handstitched in the knots and then fixed in place with hotglue to prevent any thread from escaping the loops, carefully.


The final parts to this was to attach the shoulder flap, round satin snoods in the front to be closed with snapbuttons and the same round snoods on the shoulder where the flap sits. Also the metallic braided band on the sleeve, that'll be described along with the belt on the waist.


Let's continue with the belt. I made the base for it using ropes, measured to the appropriate sections and then I braided thin leather around in the closest pattern I could figure out to the reference. This also includes the band that goes on the sleeve of the brown dress.


After having braided all parts, I dyed them with leather dye in silver and gold, and sprayed a leather paint sealant on top. Below is the silver in progress.

After that, I went through a long process of making the square "chain". The first version I sculpted one square by hand, created a mould in silicone and made the rest using thermoplastics in that mold. It came out alright, but the scale was way too large/the "chain" was too long in the end.


So, I made an attempt instead at 3d modeling a square I'd be happy with and printing it on my resin 3d printer. After some tries it came out alright, and I repeated the process of making a silicon mould and pressing thermoplastics (Thibra, in this case) to make my replicas.

The reason for doing all of this in thermoplastic instead of simply printing however many squares I wanted is so I could heat up the screw-loops I used in order to link all of the squares together. In my mind it's more reliable than having small hoops in resin, as it can be quite fragile.


After attaching the screw loops and painting up the new squares, I linked them together and attached to the braided belt pieces!
We're now starting to reach territories of the costume that I've reworked or entirely remade since the initial wear, so I'll try to keep the process relevant and point out where I've made improvements to functionality or fit.
The feet and the single glove have seen quite a few iterations, primarily the feet as it's been a real mess having to make ... well, foot-armour. Toe-armour. Call it whatever you want. The fabric has been kept consistent between glove, sleeve and feet throughout the upgraded versions.


Initially I started out with making a glove in the gold stretch fabric I'd selected, and then market where I anticipated to glue the armour bits onto the glove itself. Since the fabric was one of the very shiny slippery variants, I suspected that it would be near impossible to glue anything relably onto it so ... I sectioned in a black regular jersey fabric.


All sections attached, inside out and right side out. This took an absolutely ridiculous amount of time, made the final result quite uncomfortable but it gave me some peace of mind and that's key when it comes to armour gloves I think.
As for the armour, I used Worbla in 1-3 layers and sculpted the pieces required.


After refining the sculpt, I primed all the pieces with wood glue and painted. Finally attaching everything with glue onto the black sections of the glove.For the first version of the feet, I actually "just" sculpted ... toes, in worbla, as I had absolutely 0 idea how to make it reasonable and I was also running out of time to complete the build. I used regular toe-sockes and just kinda crammed my own toes inside of the worbla toe-armour..bits lol.


First "edition" glove and feet.
For the second edition, I primarily reworked the feet as they were absolute garbage uncomfortable to wear and also didn't really look the way I wanted. I still had quite a lot left of the initial fabric used for the glove and sleeve, so I used that and made what I can only call footgloves.


This took many many attempts in working out the fit so that it was tight but at the same time wouldn't break when I took it on/off and also that any seams would be hidden by the new sandal going on top with the more regular "greave"-like coverings.


After finally having worked out the "footglove", I made new toecaps in thibra and glued them on - similarly as to how one would do for regular armour gloves. This was much more comfortable, and a step closer to how I wanted the whole thing to look. I didn't want to build a foot on top of a shoe as I think it looks disproportionate and not as realistic, although the sculpt and comfort definitely would be more manageable to achieve.
Finally, we're on to the current version of glove, feet and sleeve. For this I've re-purposed the original worbla armour of the hand but with a new glove underneath. For the foot, the same sandal is used but a new sock and new toe"plates" are done. All of this was done mostly because I found an absolutely gorgeous material to work with, which was totally sh*t to wear since it's super plasticky but what is art without suffering I suppose...


Basted up a new glove and stitched it, not using any additional jersey layers this time instead putting my faith in my skills of using glue to attach the armour back onto the new glove.
As for the feet, I used mostly the same pattern as the first gold footgloves but I added fourchettes for each toe this time to make it easier to take on/off.


After being happy with the new footgloves, I sculpted the toecaps in thibra and glued them on with 3 segments per toe except for the big toe which has 2. I don't really have any closeups of this, but it's quite similar to the "middle" foot version above.
The actual "armour" bits themselves are quite straightforward, considering.
I started out with making my patterns for the foam bases, and using these I drew by hand all of the sculptural detail that was going to be added on top or in the case of the thigh piece - reduced via soldering iron carving.


For a majority of these pieces, I used the texture zoomed in on my monitor which I then traced by hand as the armour was adjusted to my personal fit and needed manual adjustments while drawing all the placements and scale.


After being happy with all of the decorations (with minor exceptions that I either sculpted or sectioned by hand directly when processing the armour), I scanned them to ensure that I could print as many templates as needed which turned out very handy considering I remade the leg pieces once.
Either way, these first pieces were done very manually. I started out with placing my template on top of the pieces and tracing the outline for where things were supposed to go.

After having done that, I split the entire pattern in multiple different ways in order to get all the complete pieces, traced that onto 2mm eva foam and cut out by hand. Then I started the puzzle of aligning all the bits and gluing them down one by one.

This process was repeated for all foam pieces. For the only outlier in Foam+Worbla which is the shoulder, I had a similar approach but slightly different method.
I did trace the outline, as on the foam. But then I used worbla directly layered while hot, to achieve the sculpt.


The top part of the shoulder is mostly freehand-sculpted, unless you take into account that I meticulously measured where things should be placed to ensure as good of a symmetry as possible.


The remaining parts for the shoulder specifically was to attach the two parts together, which I did by poking holes in both and using a strong thick thread to tie them together. After priming with woodglue and painting, the whole thing is finished with some metal rings and leather straps, so it stays put according to reference.

The arm-armour is entirely made of foam, and I had to really consider the geometry of how I assembled it as I wanted to keep it as seamless as possible. So, the way it fits is simply by pulling it onto my arm. Which makes it occasionally hard to remove (especially the lower part) but it's the best I could figure out.
I don't really have any photos of the process, but the "knot" at the top of the shoulder was assembled in the same way as the decorations on the leg, while other parts were a bit more freestyled.


The thigh armour had all of it's details carved with a soldering pen, as mentioned above, as for some reason I am still completely incapable of figuring out what kind of attachment to my dremel works to sand High Density EVA foam. All parts that were done primarily using EVA foam were primed with cosbond, and painted using varying types of acrylics.

So, some time later I decided to remake the pieces that go onto the legs. I used the same materials, but simplified the process a bit for myself. I used the previous pieces as base references for my patterns, but for all the finicky gold details I used my Silhouette cutting machine to get it all cut while I was working on getting the rest prepared. In this respect, it was very helpful that I did scan everything that I had drawn by hand!


Tracing and puzzling, round 2
As with the previous bottom leg parts I had a zipper in the back to take the pieces on/off and also ensuring that they could sit as snugly as possible to my leg.

The thigh part was the only one that still had a lot of manual cutting and carving to be done, considering the size of the pattern it might've been possible to have it carved with a laser-cutting-machine but I don't have one of those so my hands will have to make do.


For these new leg parts, I used PlastiDip spray as primer and then painted with acrylics much like usual. I don't have any close-ups of these new legs in particular, but I'm very happy with the result as they are both more comfortable and more crisp in their detail.
Finally - we reach the helmet. This was a piece I studied a lot to understand how it should all come together, and I built it out of EVA Foam and foamclay for the first version.
To start with, I patterned and cut the base with the kind of grid visor front, and the wings.


The squigglies in front were patterned as separate parts similar to any other 2mm foam details for the other sections of the armour in general. The wings were sculpted freehand with foamclay.


All separate parts were then assembled and the wings as the final cherry on top in place.


On the inside of the "chin pieces" there's also a metal wire glued down so I can position them accurately while wearing. The whole thing was primed with woodglue and painted. The reason for using woodglue on this piece in particular was to add some slight rigidity (is that even a word?) to it compared to a more flexible primer.


I think this first helmet came out quite alright, but due to who I am as a person... I recently remade it entirely. This time I worked primarily digitally in working around the in-game model, fixing and altering the sculpt and then printing it in PLA. I did all of this in Blender, a free open source 3d software with an abundance of tutorials on how you can work with the program. None of the details were really modelled originally in the game, so a lot of detail and also reworking of the entire geometry was needed by me in order to achieve a functional print. But for about a week of effort spent from 0-complete helmet, I'm ok with the result.


Above is some of the process on adding detail to the squiggle section


The wings were very challenging, as I'm not too familiar with "organic" sculpting like this. But I'm happy with the end result. In order to make every separate "feather" I had the base shape just as a plain and I cut the middle of where I intended every feather to go with the knife tool. I then separated each of these "mid-feather" edges and converted into a curve. This curve I then turned into a cylinder, reverted back to a mesh and adjusted into the final shape. Marked sharps, subdivided and extruded the sharps only.
That's... the quick summary hah.
Once I was happy with the model, I imported the entire thing into my Bambu slice program in order to separate it into pieces that fit into the printer but also to make sure that the initial scale of the whole completed piece would be correct. Then I got to printing!

Front piece basically fresh out of the machine

All pieces after some initial sanding and glued together.


I then put a lot of 2-component filler on top of seams and spots that had imperfections, sanded a LOT and then sprayed 3-5 layers of spray filler.


I then did a coat of matte black spray paint before covering the entire thing in gold and finishing it off with a brave attempt at weathering. The absolute final thing was a clear coat for maximum shine.
As mentioned previously, most parts have received multiple rounds of paint touch-ups, ranging from new gold, more shading, clearcoating or entirely new pieces. Anything related to the "armour" category of this cosplay is still something I feel could be done over more times and improved, but I guess it's because it's hard to resist painting things again and again hah.
For the makeup, I had some help from a friend to make a headcast of my own face to start out with.

I casted a positive in plaster, and started on the sculpt of the prosthetic. I didn't finish this in time for the first couple of times I had this cosplay, instead opting to do a mix of latex+cotton directly on my face which is quite common for horror/zombie makeup. Anyway, for the sculpt I referenced her texture again to get an understanding of the "pattern" of the rot.

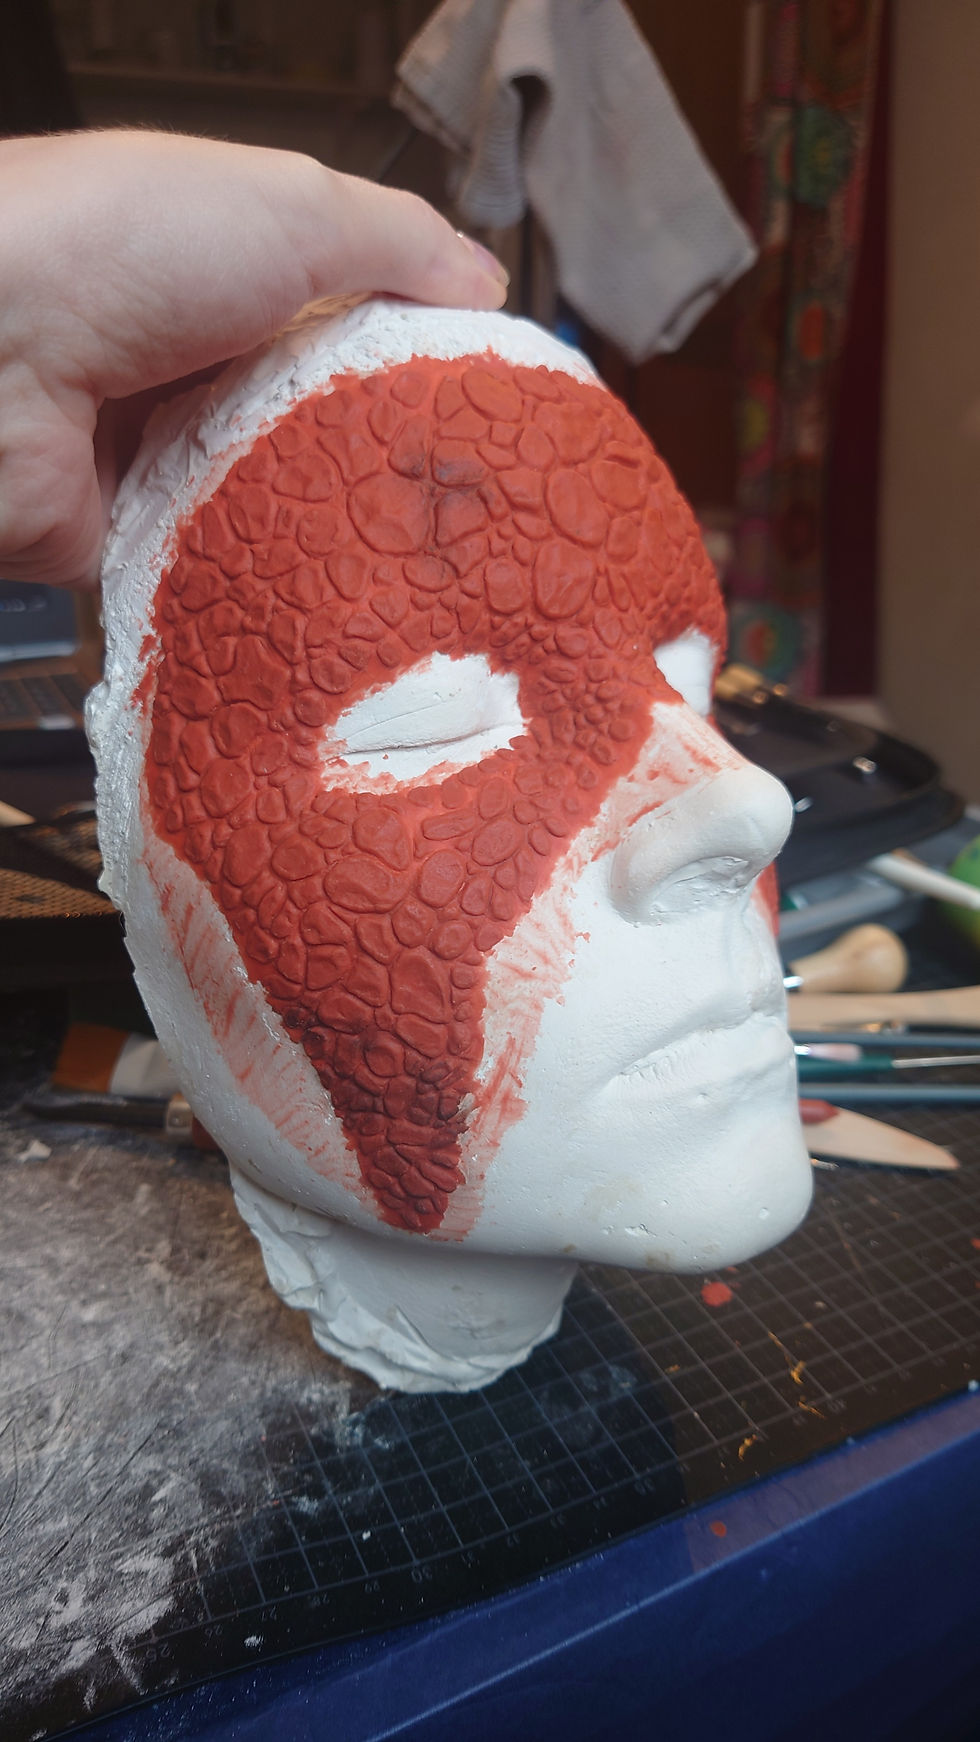
I used plastilina clay, which is a very malleable non-hardening clay to create the sculpt. I then covered the edges with even more clay in a very thin layer to have a buffer between my face and the new layer of plaster that I used to create a cast of the sculpt.


Sculpt walled and plaster cast. I then use latex in the finished cast, to create a prosthetic piece I can apply with spirit gum on my face which makes the whole makeup process much smoother and also allows me to paint/do the makeup of the prosthetic piece beforehand.

The final latex cast being done.
So, at this point I guess I should say congratulations for reaching this far! There is literally only one more piece to this costume for me to describe - the sword.
To start with, I took the sword from my collector's edition statue and scanned it

I then upscaled it and assembled my paper pattern, and checked the scale to myself based on the statue as reference.


I then grabbed a large chunk of wood, and sawed out the base shape

That shape was then sanded, filed, sawed - thorughly worked through for a nice smooth edge and appearance

I then covered the entire thing with black Worbla. This is in part to ensure that the wood has a good cover from moisture and any other kinda weird things that can happen to wood, but also to allow me to carve out the runes from a nice thin layer of material.


Smoothing the worbla and drawing up the placement of the runes using the initial template as guide

Cutting/carving out the runes out of the worbla and then covering the whole blade with woodglue


The finished sword! Painted black, and then many layers of gold and finished with multiple coats of clear spray polish.
All in all, this is a VERY large project, and one that I happened to document very thoroughly. I hope this may be of some help or inspiration if you plan to make Malenia, although by this point I guess the hype may have died down.
If you have any questions about specifics in this documentation, feel free to reach out to me on instagram or via my contact form on the main website and I'll do my best to reply!Enjoy a selfie from my most recent wear June 1st 2025, and the dedicated album of fancy photos can be found here https://www.darkesttearsdesign.com/malenia-elden-ring


