
Lady Maria Build Log
- darkesttears
- May 3, 2020
- 8 min read
Updated: Jun 7, 2025
Hello!
Lady Maria is undoubtedly one of my most worn and used cosplays to date. I made her in 2018 for the Master tier cosplay competition at NärCon Summer. I've updated her between each wear, and I think I'm finally getting close to how I want her to look. Bloodborne is one of my all time favourite games, and while it did feel a little cliché to make Maria, I just couldn't resist my best vampire (vileblood) girl. I've won a few prizes with it at smaller competitions, but nothing major (sadly).
Bloodborne as usual is a game where references are extremely hard to come by, and having them in even remotely neutral light. This costume is also one that I wanted to get as accurate as possible so that means I spent almost a year only hunting down the proper fabrics before even starting the build. I'm still not a 100% happy with for example the brocade going down the front of the coat but I have no idea if I'll ever be able to find a better one unless I embroider the whole thing myself.
I'll do my best in categorizing each part as this build was in no way structured piece by piece (as usual).
First up let's talk about the pants! I ordered a wool-mix fabric which was as similar as possible to the design. Originally I wanted a fabric from Mood, but it was out of stock when I started this costume. Fortunately for me, a year later it returned in stock so I ordered it and used it for version 2. But I'm getting ahead of myself.

The fabric itself before getting to work on it.


Testing the fit and then cutting the excess. For patterning I traced a pair of existing pants I had at home and modified it. The hardest part was to get all the stripes to align properly. I chose not to have a zipper and instead added belt-hoops to the top for them to stay up.

Handstitching the belt-hoops.
That's it for the pants, it's not really much to say about them. For version 2 (which I sadly lack photos of) I replicated the pattern but extended the top so I could have an elastic ribbon sewn in instead of a belt.
Next up, the undershirt and vest. These are two pieces that don't really show a lot, but still have a moderate amount of detail. For the undershirt I chose a brown/black and gold brocade in as similar of a pattern as possible to the reference. For the vest I bought a pair of dress-pants secondhand and repurposed the fabric.

The shirt brocade fabric on the outside before working with it. This fabric was mostly synthetic which made it very uncomfortable to wear, especially the sleeves which came out too thick for my first version of the shirt.

Also trying to draw any type of pattern on the backside was a hot mess due to the extreme shine it had.

A messy photo of the base shirt. When looking closely at the reference you can see that the pattern is identical on the inside and outside, so my solution for this was to make it double. What I mean by that is basically lining the shirt with an identical copy of the shirt so it's in double layers of fabric for the inside and outside to be identical. I get that this is a very poor explanation but I don't really know the proper words for it.
The shirt itself closes with small hooks, as I didn't see any visible buttons on the reference.

Handstitching the hems and adding the hooks at the same time

Handstitching the sleeves in

Trying it on before the absolute final hems. I had to make the sleeves slimmer after finishing up the coat as I accidentally made the sleeves to tight on the coat to be able to wear the shirt underneath. After having it at NärCon Summer 2018 I decided to remove the brocade sleeves entirely and replaced them with long t-shirt sleeves instead which made it much more comfortable.

Marking the pattern of the vest on the secondhand pants


Pinning the parts together to adjust the fit

Trying out the length of the shirt and vest after zigzag and base stitching, with the pants and boots (pre modifications).

I originally intended to sew white thread around the edges of all the satin ribbon I was using for the edges of the vest but as I'm sure most of you know by now I hate doing this kind of work (and also it came out extremely uneven) so I painted it instead.


Carefully painting the satin edges after sewing the satin ribbon onto the vest

Testing the finished shirt and vest together. The buttons are nothing special, just regular shirt buttons, and the buttonholes were handstitched.
As I seem to be working my way inside out with this, let's take a look at the coat!
I had a VERY hard time deciding the fabric for the coat, as it's a black floral brocade with very small flowers ingame. Fortunately for me I managed to track down a small online store who had just what I was looking for. They do take custom orders for specialty fabrics so if you're into making something really 100% (and if you're ready to pay for 50m of it) check out https://www.sartor.cz/ (not sponsored).

The brocade I chose for the coat. Since it's black the details rarely show in photos, but I'm very happy to have this instead of a plain black or a brocade with a pattern that isn't as accurate.
As far as patterning goes I splurged a bit and used actual fabric, since I didn't dare to trust only a paper mock-up. I took some guidance from the patterns I had for men's style period clothing (same as I used for Lestat) and modified it to be accurate.


Creating the fabric mock-ups


Testing the mock-up

I added an almost ridiculous amount of width to the side-slits, but I thought it appropriate given how flappy the garments are in-game. Sadly this rarely shows when I wear the costume. Overall the patterning was very difficult for the coat, since it had so many pieces and making it snug and form-fitting.

Testing the top part of the coat after sewing

Taking out the parts for the liner fabric. I traced the proper pieces of the brocade onto the red liner fabric so it would be a bit easier to know it fits.

Adding the top and bottom parts together. For the collar I used a sturdy jeans-like fabric on the "inside" (the part that's folded) to make it keep it's shape. I also added the gold floral brocade to the edges, as well as did my best to make the liner fabric fit just right.


The finished coat before doing the final bottom edges. Given that all the fabric was synthetic I cut the edges somewhat sloppy and then used a candle to melt the edges, giving the rough look it has ingame.


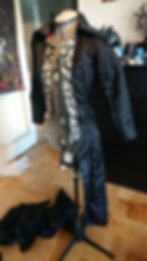
Trying everything on that I had finished at this point, with a placeholder scarf
The shoes for Maria was one of the easiest parts of the costume since I got very lucky with my secondhand purchases. I managed to snag a pair of Timberland boots off Tradera (swedish eBay) which fit perfectly. I have fairly large feet so shoes are always a big struggle when it comes to my costumes.


The boots pre-modification

And all done! I added a dark brown leather part to the tops of the boots that I repurposed from a secondhand leather jacket. The top bits going to my knees are tubes made of the same fake leather used for the cape.
Going over some more of the leather bits, we have the shoulderpiece and the gloves. I can certainly say that these gloves have been one of the most infuriating pieces of a costume to make ever. I used secondhand leather stripped from leather jackets to make the gloves, so they would have an aged look without having to weather them.

I don't remember how many tries it took for me to actually make a pattern for them, nor do I really recall what type of pattern I ended up using... needless to say it was a mess to figure out.

Cutting out the pieces
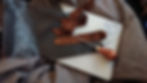
Handstitching fourchettes and stuff

Basically everything except the assembly of the handpiece to the upper arm piece was done by hand. In order to attach those two parts together I was kindly allowed to use an industrial machine for leatherwork by a friend.
For the shoulderpiece I used a light brown/beige leather.

Tracing all the parts

Placing all the parts to make sure they work together

Sewing everything also using the industrial grade sewing machine. I used a different type of leather for the "inside" bits in order to get the double layered look. This is before cutting off all the threads and adding the chain and cape.
That's about it as far as photos go for version 1. Well, except the weapon of course!
The Rakuyo is by far one of my best props when it comes to durability, appearance and accuracy. Apart from it not being made out of metal, that is.
I made it primarily out of Elm, with worbla covering it. It also has a metal tube serving as the handle so the small dagger can slip in and work as either a long sword..lance thing, or separate weapons (like in the game).

Selecting the two pieces of wood and starting the measurements/drafts

Cutting the lengths for both blades


Getting the rough shapes out, and then refining them a bit aswell as adding the metal handle


Gluing magnets to the ends of both blades, and gluing down the metal sides before adding additional screws


The bases all done!


Adding EVA foam and Worbla decorations (and some hotglue)

Decorating the tiny blade

All ready for paint! I used a soldering iron to carve the pattern into the top part of the blade.

Painted up and with the added worbla handguard bits.
That's about it as far as photos go for version 1 so I'll recap the rest in text:
* Made the scarf out of white synthethic fabric, stained with different red acrylic paints
* Made the broche for the scarf aswell as the shoulder piece with worbla and added resin cast crystals
* Watershaped wool felt to make the hat
* Added the cape to the shoulderpiece. The cape was made out of fake leather lined with a rough herringbone weave fabric (as per reference).
* Made the hat decoration out of worbla and added feathers
* Made the belts out of genuine leather
There's not much to say about the wig for version 1 as I barely altered it, I just added the dark brown ribbon to a light blond curly/wavy lacefront wig.
Here's a photo after the Master competition at NärCon Summer 2018 with version 1

For version 1.5 and later on 2.0 I made minor yet significant upgrades.
Version 1.5 mostly just saw an improved hat and scarf-broche, as I decided to dress the wool felt hat in leather and commissioned a 3d printed cabochon for the broche from a friend.


Dressing the hat


Finished refurbished hat

Making the shape for the gem to fit into the cabochon

Finished gem!
Now I'm completely out of WIP photos, but for version 2 the things I improved upon was:
* New pair of pants with a better choice of fabric
* Changed the undershirt sleeves from brocade sleeves to soft stretchy long t-shirt sleeves
* Completely new hat made out of thin EVA foam dressed in a better choice of brown fake leather.
* New scarf, actually made a proper cravat instead of having to attempt to wrap it properly all the time
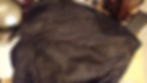
*New wig in a much lighter blonde, curled myself
While I do like this cosplay I'm a little tired of it since I've had it to basically almost every event since it's creation. There's still at least one photoshoot planned for it, but other than that it'll probably take some time before I'll be hyped about wearing it again.
I guess that pretty much sums it up, as usual if you have any questions or want me to explain further about anything feel free to write.
For all the cool photos, head over to the dedicated page for Lady Maria!